Introduction
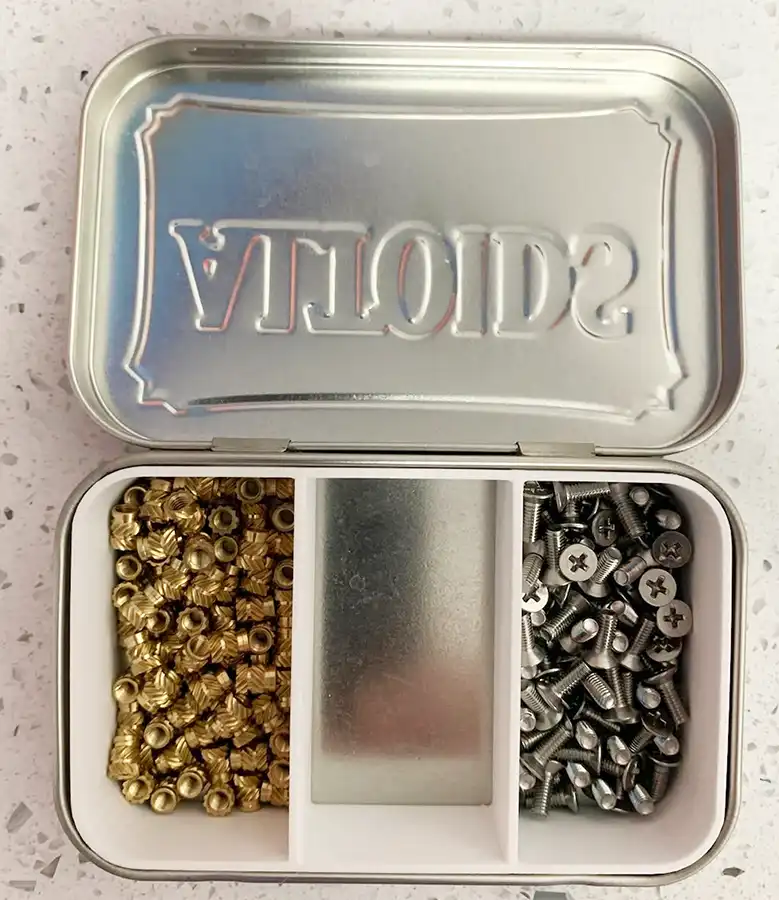
Altoid mint tins are the perfect size for organizing lots of little things. I use one to store my Ruthex M3 Threaded Inserts alongside some M3 x 8mm countersunk machine screws. Yes, I also organize the INSIDE of my altoids tins.
I used to stash my tins in a drawer, but now that I am on my way to having 70 square feet of Honeycomb Storage Wall, I built wall-mounted racks for them, so I can display them in the open and I can find whatever I need without having to search through a pile of tins. I could have just whipped up something simple and called it a day, but since I am obsessed with saving filament, I designed a rack that uses much less filament and which holds six altoid tins
The “Blocky” Design
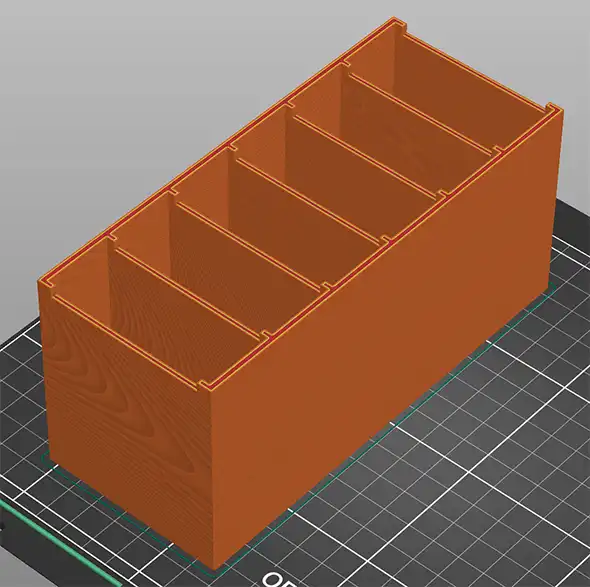
The easiest thing to do would have been to create a rectangular solid and hollow it out. But the easiest way is far from optimal. Here’s a picture of what the easy way looks like. We’ll call this design “Blocky”.
A lot of internet experts would tell you to the best approach to saving filament is to use the infill settings on your slicer. Just crank the infill down to 10% and call it a day. Cutting out geometry, they say won’t do much better, and you’ll end up with a part that’s too weak. So let’s take a look at the effect of infill settings on “Blocky” with different wall thicknesses. These numbers are based on a 0.6mm nozzle size.
| Wall Thickness | Infill | Filament |
|---|---|---|
| 3mm | 10% | 185g |
| 3mm | 100% | 250g |
| 2mm | 10% | 169g |
| 2mm | 100% | 177g |
Looking at the 3mm wall settings, the internet experts seem to be right. There’s huge decrease from 250g down to 185g by dropping the infill to 10%. But 3mm walls are overkill for an altoid rack. 2mm walls should be plenty strong. What about them? At 2mm, the infill settings barely make a difference. Why? Because at this thickness, the walls are mostly made of perimeters–there’s hardly any infill to begin with.
So are the internet experts right? Should I be satisfied with 169g as the best result and call it a day? If you’ve ever read this blog before, you already know the answer to that question. Of course not. We’re going to crush that number.
Beyond the “Blocky” Design
While the Blocky design is easy to make, simple and reliable, it can definitely be improved upon with a little bit of work. The obvious thing to do is to cut some holes in the solid walls of the Blocky design. But with 3D printing, cutting holes in vertical features can be a problem. Vertical features that contain “overhangs” need to be supported in order to print, which means printing support material, which often negates most of the filament savings. And that really sucks–getting a weaker part and not saving filament.
But what happens when we overhang just a teeny tiny bit? What if we overhang just half of the width of one perimeter, like 0.3mm? Well it turns out through simple physics, that this tiny bit of extrusion hanging over free space gets enough support from the structure that it doesn’t need support material.
By designing the holes in the vertical features properly, so that the overhangs are all 45 degrees, entire self-supporting structures can be built that use a fraction of the filament. Two shapes work very well for this technique. I don’t know if they have formal names. I call them Rectified Hexagons and Ascending Chevrons.
Rectified Hexagons
Regular hexagons are a strong and efficient way to create strong, light parts. Just ask any honeybee. But in 3D printing a regular hexagon is not ideal, because the interior angles are all 120 degrees, so they aren’t self supporting. (Because when you split that 120 angle, you get two 60 degree angles, which aren’t self supporting). This can be solved by creating a self supporting Rectified Hexagon.
To make a Rectified Hexagon, you need to do two things. First orient the hexagon so that the flat sides are vertical and there’s a vertex pointing up and a vertex pointing down. Then stretch the hexagon vertically so that the angle between the sloped walls are now 90 degrees, which splits into two 45s, each of which is self supporting. The resulting Rectified Hexagon will be twice as tall as it is wide. You can stretch the side walls to be taller if you like, but it makes it less efficient to lay them out in a regular pattern, so it’s best to keep the 2 to 1 aspect ratio. You can see the result below.
Do you really need to rectify the hexagons? Well yes and no. It depends on how good your printer is at bridging, and how good it is at overhangs. With a part this small, you can probably get away with a normal hexagon. But it’s easy enough to make them rectified, and besides, I did it already for you.

Once you’ve laid out a single Rectified Hexagon, you’ll need to repeat it in a 2D pattern, separated by a fixed distance. The spaces BETWEEN the hexes will define the structure of your part; the hexes will be the holes. Generally I like to make the structure at least 2.5mm thick. If it’s too thin, it will wobble around too much during printing. But definitely experiment, this is a clasic weight vs strength tradeoff.
Ascending Chevrons
Rectified Hexagons are the most efficient way to fill the space, but in some cases it’s simpler and easier to lay out a chevron shape, oriented so that the chevron is pointed up, with the chevron supported on both sides. I call this design “Acsending Chevrons”. The altoid tin rack, like many of my designs, uses both techniques.
To make an Ascending Chevron, make a right triangle with the 90 degree angle facing up. Then duplicate that triangle and offset it vertically. Connect the two triangles together. The space between these two triangles will be the structure. Like with the Rectified Hexagons, I recommend it be 2.5mm thick or bigger. Set the width of the chevron so that it’s supported on both sides.
When you need just one column of Ascending Chevrons, like on the side of this altoid rack, it’s a simple matter of duplicating the Ascending Chevrons at a spacing of your choice. The more you have, the stronger the part will be. But in practice, I use 3 to 4 chevrons for most parts. Note that for the altoid tin rack, I filled in the area above top chevron. If you’re OK with a serrated top edge, you can cut away the area above the top chevrons and save even more filament, which I do in some of my designs.
You can also arrange your Ascending Chevrons in a 2D grid to efficiently fill a larger area. However since the chevrons need to be supported on both sides, you will need to create some interior support columns. In this design. I keep the support columns the same size as the chevrons for consistency.
Putting It All Together
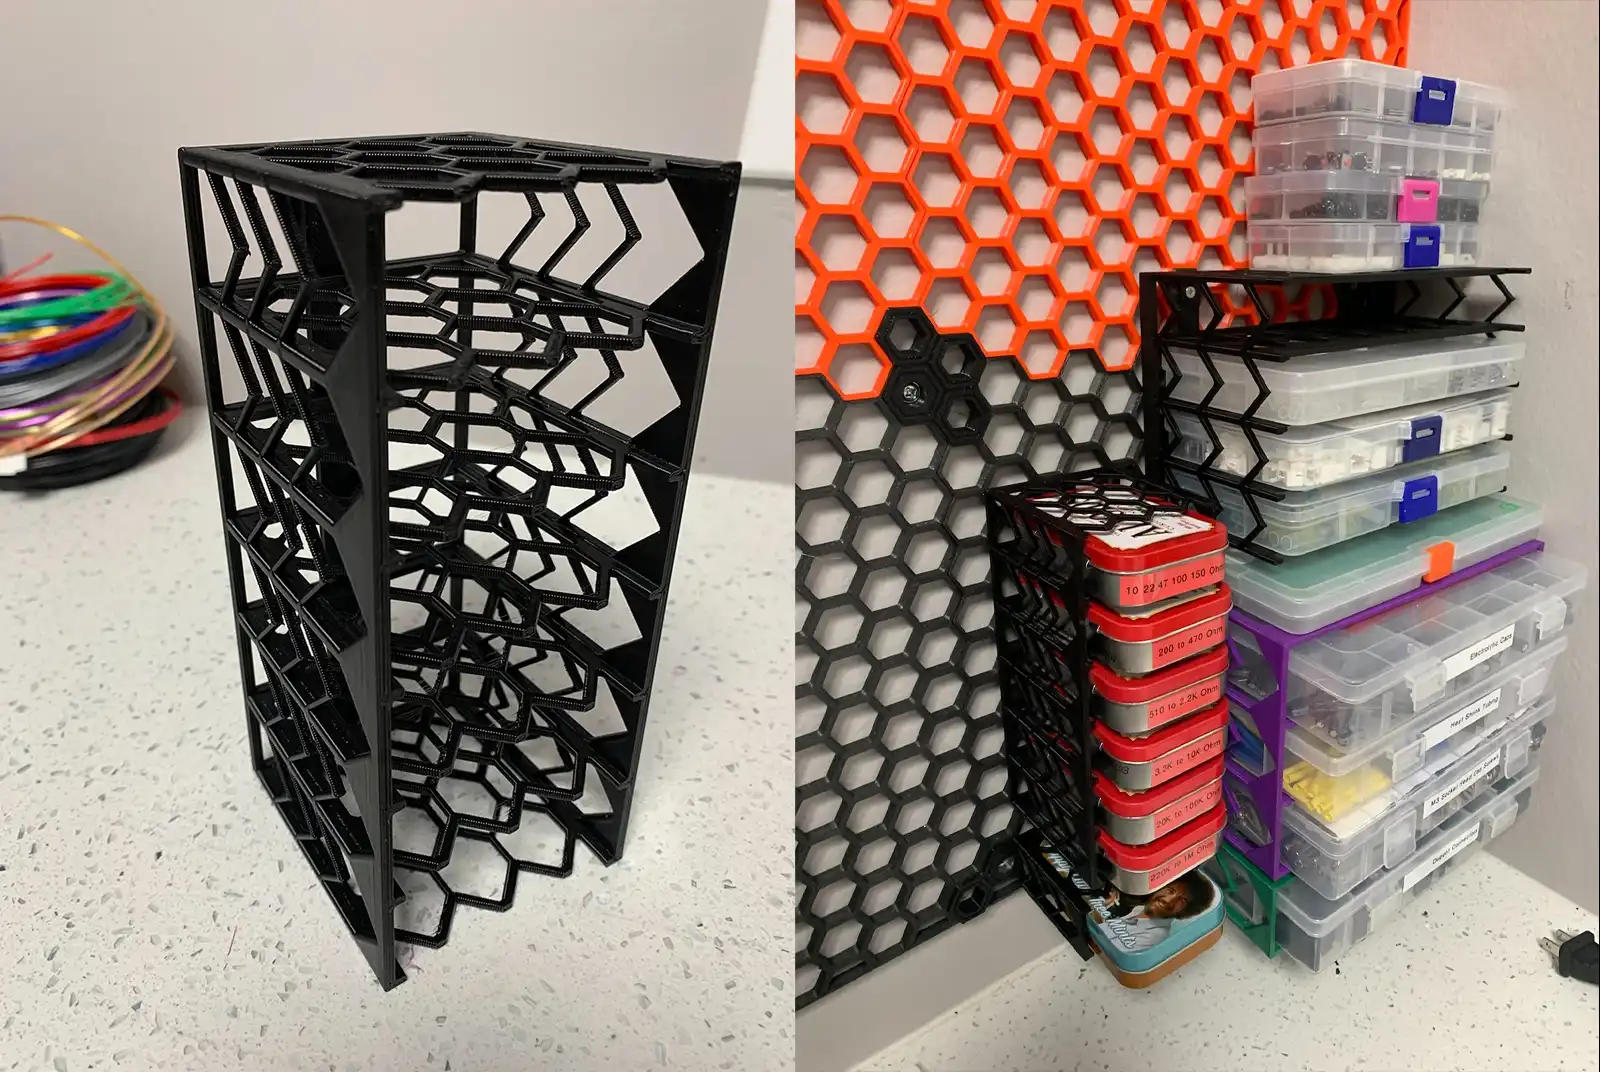
Here’s the final result with Ascending Chevrons on the short sides and Rectified Hexagons on the long side. This version is six altoid tin holders merged together into a single unit, with shared walls between each tin.
My final version of the 6-tin rack weighs in at 76g, almost 100 grams lighter than Blocky design.
But How Strong Is It?
All the internet experts said that this was a bad idea, that this type of construction is too weak for 3D printing. So I did an empirical test of ttheir theory. I grabbed what was handy: 14 pounds of old SCUBA lead weights and a 10 lb dumbbell, 24 pounds total. See the results for yourself.
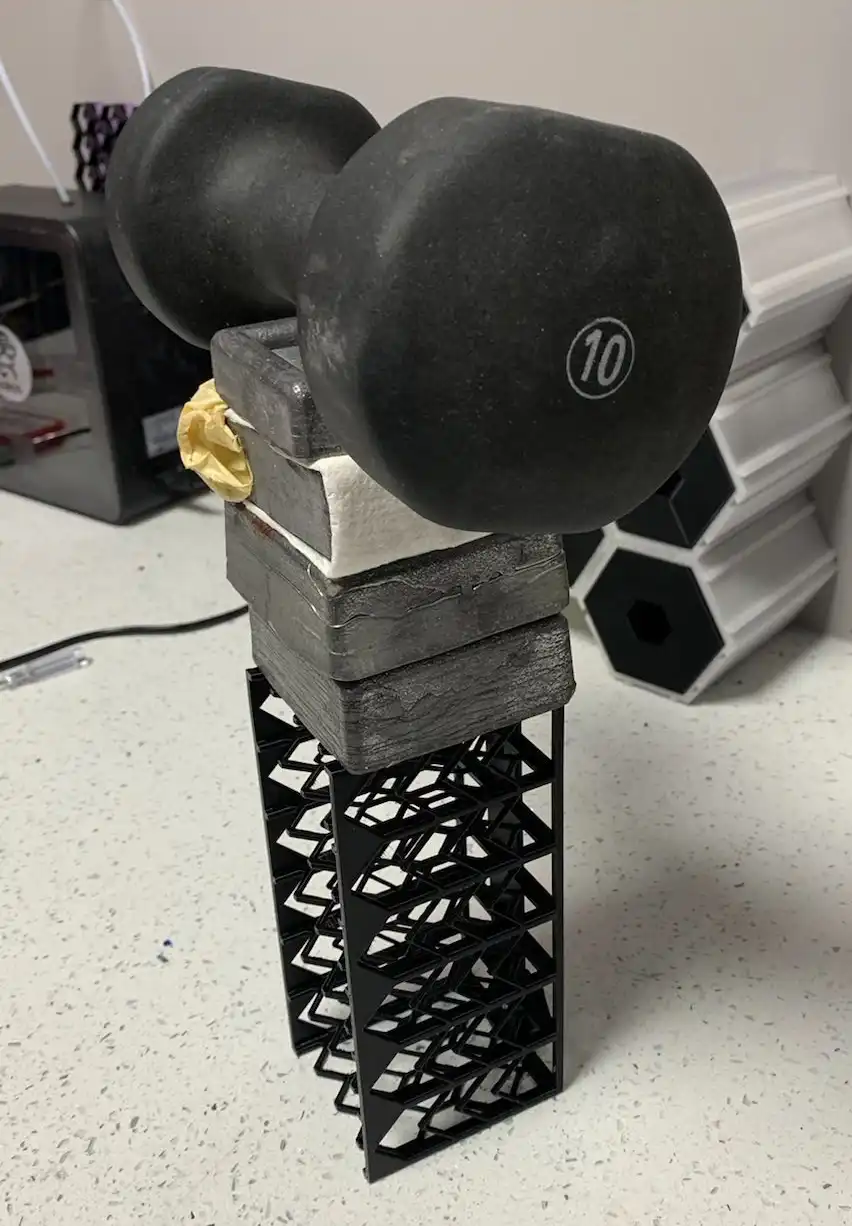
Incidentally, an altoids tin has a volume of around 89 cc. Lead weighs 11.34g per cc. That means one altoid tin filled entirely with lead would weigh about 1 kg, or about 2.2 lbs. Six altoid tins filled with lead would thus weigh in at 13.2 lbs. So you could literally fill the tins with lead and that’s still less than my test weight. I’d call the design strong enough.
Print Times
| Printer | Print Time |
|---|---|
| Prusa Mk3s | 4 hr 44 min |
| Prusa XL | 3 hr 22 min |
For comparison sake, the Blocky version of the model takes about an hour longer to print at the same settings. (The internet experts also said this design probably wouldn’t print faster).
Conclusions
We defied conventional wisdom by creating a part out of a thin, self-supporting skeleton, and by doing so the result was a part that uses only 45% as much filament, costs $1 to $2 less to print, prints about 25% faster, and which can support the heaviest possible load placed inside it–solid lead. It’s safe to call this one a success.
Chances are, if you're here, you play tabletop games. So hopefully you'll like Waddle Waddle, a brand new penguin-themed tabletop game that I created using photos of penguins that I took while in Antarctica. If you printed one of my 3D designs, please check out Waddle Waddle on GameFound.
Downloads
| Item | Download Link | |||
|---|---|---|---|---|
|
|
This work is released under the CC-BY-NC-ND-4 International License
How To Support Me
Please check out Waddle Waddle, my penguin-themed tabletop game that's perfect for family game night. It's both fun AND educational. It's filled with dozens of great photos of penguins that I took while in Antarctica. It plays 2-6 players and is great for players 9 and up.
My designs are all designed to minimize filament usage, and that directly saves you MONEY, and many hours of print time. Most of these designs take two or three generations to perfect. You can show your thanks for me saving you money and many HOURS of your time making by a small donation to defray the cost of professional software licenses, printer wear and tear, and the filament I use to develop this content for you:
As an Amazon Associate I earn from qualifying purchases. By purchasing the products that I recommend through affiliate links you directly support the creation of more great content at no cost to yourself. I only recommend products that I use myself. You can read more about it here: Affiliate disclosure.