Introduction
TODO: Add all the pics
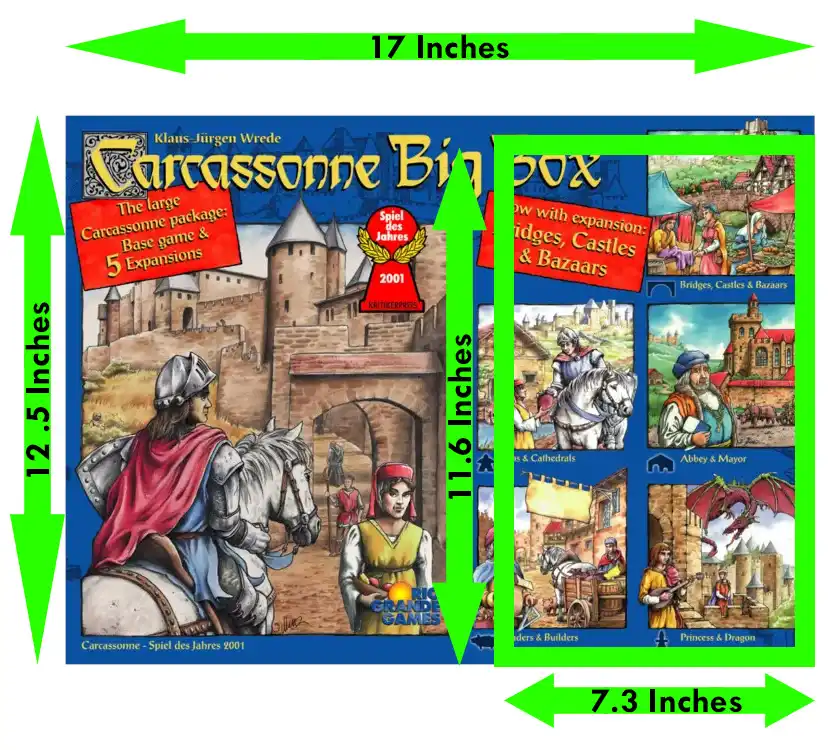
Carcassonne is one of my favorite games. It’s a classic that plays up to 6 people, and even 8 with the expansions. The Carcassonne Big Box is a great way to get the base game and several expansions all in one go. The only trouble is the Big Box is way bigger than it needs to be. It’s almost 60% empty space and it juts out of my Kallax.
You’ll also be interested in this organizer if you bought the base game and any of the expansions. Print this orgainzer and you can merge them all into a single portable box.
I wanted to print an organizer a few years back, but my workhorse Prusa MK3S was just about an inch too small to print a new box that would fit the all components. So I shelved the idea until I got a bigger printer. And that time came last year.
And so follow along to see how I fit the Big Box into much smaller box that’s less than half the size of the original, and even has room for a few extra goodies.
Big printer required
This design requires a printer with a 300mm wide print bed in at least one dimension. It fits nicely on the bed of my Prusa XL. If you don’t have a big printer, you can still print some of the interior organizer parts of this design, but if you want to save shelf space you will need to find a smaller box somewhere, or grab a razor and cut down your Big Box.
Two color optional
I’m also taking advantage of having a 2 color printer to include some labeling on the lid and interior organizer bins. If you don’t have a two color printer, you can print all these files in a single color just fine.
What’s In The Box
Starting at the top, there’s a slide in lid with the Carcassonne logo. I couldn’t find a clean vector version of the Carcassonne logo, so I made this one with a PNG to SVG conversion tool and a bit of Photoshop time.
Under the lid, there’s room for 14 of these 3x3 grids for organizing tiles during gameplay. I printed a file by SaddamCZ that I found on thingiverse. I like this version because it has dovetail connectors on each edge, and the dovetails are sized such that they only interlock in the correct orientation.
Underneath the grids, there’s room for the rulebook, score tracker, and Wheel of Fortune expansion board.
Then underneath all that, there are 8 color coded meeple bins with sliding lids, 6 individual tile bins for the expansions, starter tile and scoring tiles, a token bin, and finally one big bin for all the standard game tiles. The box is divided internally with short fences to keep things separate from each other. There’s no need for them to go all the way to the top, and that would just waste filament.
Each tile bin has a grid bottom to reduce the amount of filament used, and also to prevent a vacuum effect from making it hard to pull tiles out. Each bin has a finger pull on the side to make it easier to grasp the end tile. The telescoping lids for the tile bins are designed with a 2 color logo embedded in them. I used creative commons icons from the Noun project and SVG Repo. I think the bins look good in white, with a dark contrasting color for the icons.
The 8 meeple bins also have ventilated sides and bottoms. I printed mine each in a matching color to match the colors of the meeples, with a contrasting meeple logo that is slightly raised. The meeple logo makes a nice pull. You may find the sliding lids stick a little bit. If so, try a little bit of sanding of the lid edges, and try running a triangular file in the groove.
Print Times
Like all of my designs, all of the pieces are designed to print without need for supports. There are no thick sections on any of the parts, so infill doesn’t really matter. You’ll find little difference in print time between 10% and 100%.
There’s a lot of pieces, so I won’t go into a detailed analysis of print times. The longest print time is obviously the main box, which takes just under 8 hours on the Prusa XL with a 0.6mm nozzle. This would be a good model to try printing with 0.8mm nozzles, as the slicer says it will print in just 5 1/2 hours.
Filament
Like most of my builds, this build was printed with my new favorite filament: IIIDMAX’s PLA+. It comes in a TON of great colors for a great price. I typically pay about $12/Kg, and sometimes as cheap as $10/Kg when they’re running a sale. Use my referral code and you’ll even save 5% off that price. The best deal is to buy a 10 pack or larger order.
Conclusions
This was a fun model for me to test out the 2 color capabilities of my Prusa XL. Though I did I run into a few roadblocks along the way. I had some terrible quality issues when switching from tool 1 to tool 2. But what was weird is that 1 color designs that used either tool 1 or tool 2 by themselves printed great.
What was the problem? I had a big “blob of death” a few weeks earlier and after that incident I had replaced the nozzle on tool 1. What I learned is that anytime you change a nozzle, in addition to normal calibration, you also need to redo the tool offset calibration so that the printer can compensate for the shift between the two nozzles. It’s an easy calibration that only takes 10 minutes or so, but without it the results are ugly.
Compare the weird stringiness on the white letters in the image on the left vs the reprint, that was done after calibrating.
Downloads
I have included all the files you need to print everything, except for the 3x3 tile grids. If you want those, you’ll need to go to Thingiverse.
I have also included a separate download for the Fusion360 files. My version of the big box is the one pictured, but there are new big box versions that may have different expansions. Those versions may need additional, or different sized tile bins. All of the tile bins were made from a single parametric model. If you have access to Fusion 360, you can change one parameter and it will generate a new tile bin, including regenerating the grid for the bottom of each bin.
TODO: redo token bin with lid, in white.
| Item | Download Link | |||
|---|---|---|---|---|
 |
|
This work is released under the CC-BY-NC-ND-4 International License
How To Support Me
Please check out Waddle Waddle, my penguin-themed tabletop game that's perfect for family game night. It's both fun AND educational. It features filled with dozens of great photos of penguins that I took while in Antarctica. It plays 2-6 players and is great for players 9 and up.
See full details at the Brush-Tail Games Store
My designs are all designed to minimize filament usage, and that directly saves you MONEY, and many hours of print time. Most of these designs take two or three generations to perfect. You can show your thanks for me saving you money and many HOURS of your time making by a small donation to defray the cost of professional software licenses, printer wear and tear, and the filament I use to develop this content for you:
As an Amazon Associate I earn from qualifying purchases. By purchasing the products that I recommend through affiliate links you directly support the creation of more great content at no cost to yourself. I only recommend products that I use myself. You can read more about it here: Affiliate disclosure.